【生命周期 组件】
生命周期
引出生命周期
生命周期
又名生命周期回调函数 、生命周期函数、生命周期钩子
是什么:Vue在关键时刻帮我们调用的一些特殊名称的函数
生命周期函数的名字不可更改 ,但函数的具体内容是程序员根据需求编写的生命周期函数中的this 指向是vm或组件实例对象
1 2 3 4 5 6 7 8 9 10 11 12 13 14 15 16 17 18 19 20 21 22 23 24 25 26 27 28 29 30 31 <div id ="root" > <h2 v-if ="a" > 你好啊</h2 > <h2 :style ="{opacity}" > 看笔记学Vue</h2 > </div > <script type ="text/javascript" > Vue .config .productionTip = false new Vue ({ el : '#root' , data : { a : false , opacity : 1 }, methods : { }, mounted ( console .log ('mounted' , this ) setInterval (() => { this .opacity -= 0.01 if (this .opacity <= 0 ) this .opacity = 1 }, 16 ) }, }) </script >
分析生命周期
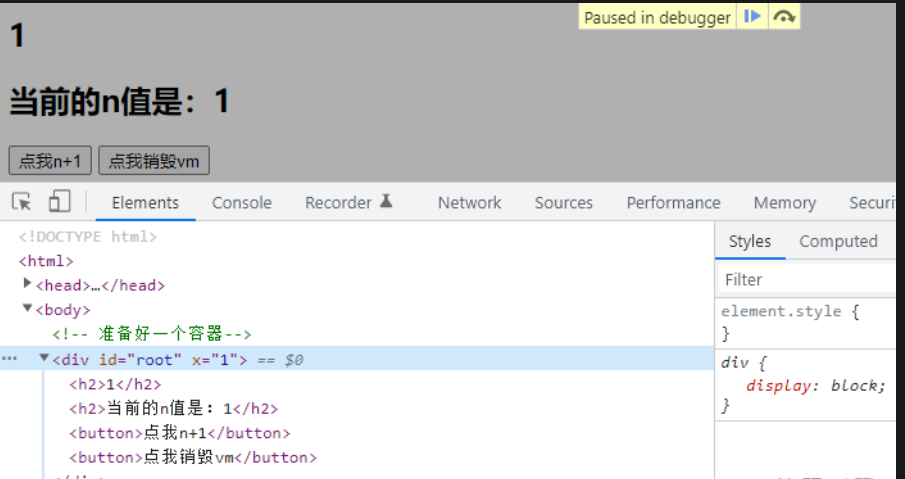
1 2 3 4 5 6 7 8 9 10 11 12 13 14 15 16 17 18 19 20 21 22 23 24 25 26 27 28 29 30 31 32 33 34 35 36 37 38 39 40 41 42 43 44 45 46 47 48 <title > 分析生命周期</title > <script type ="text/javascript" src ="../js/vue.js" > </script > <div id ="root" :x ="n" > <h2 v-text ="n" > </h2 > <h2 > 当前的n值是:{{ n }}</h2 > <button @click ="add" > 点我n+1</button > <button @click ="bye" > 点我销毁vm</button > </div > <script type ="text/javascript" > Vue .config .productionTip = false new Vue ({ el : '#root' , data : { n : 1 }, methods : { add (console .log ('add' ) this .n ++ }, bye ( console .log ('bye' ) this .$destroy() } }, watch : { n ( console .log ('n变了' ) } }, beforeCreate (console .log ('beforeCreate' )}, created (console .log ('created' )}, beforeMount (console .log ('beforeMount' )}, mounted (console .log ('mounted' )}, beforeUpdate (console .log ('beforeUpdate' )}, updated (console .log ('updated' )}, beforeDestroy (console .log ('beforeDestroy' )}, destroyed (console .log ('destroyed' )}, }) </script >
来讲一下图中间大框框的内容
先判断有没有 el 这个配置项,没有就调用 vm.$mount(el),如果两个都没有就一直卡着,显示的界面就是最原始的容器的界面。有el这个配置项,就进行判断有没有template这个配置项,没有 template 就将el绑定的容器编译为 vue 模板,来个对比图。
没编译前的:
编译后:
template 的作用
第一种情况,有 template:
如果 el 绑定的容器没有任何内容,就一个空壳子,但在 Vue 实例中写了 template,就会编译解析这个 template 里的内容,生成虚拟 DOM,最后将 虚拟 DOM 转为 真实 DOM 插入页面(其实就可以理解为 template 替代了 el 绑定的容器的内容)。
第二种情况,没有 template:
没有 template,就编译解析 el 绑定的容器,生成虚拟 DOM,后面就顺着生命周期执行下去。
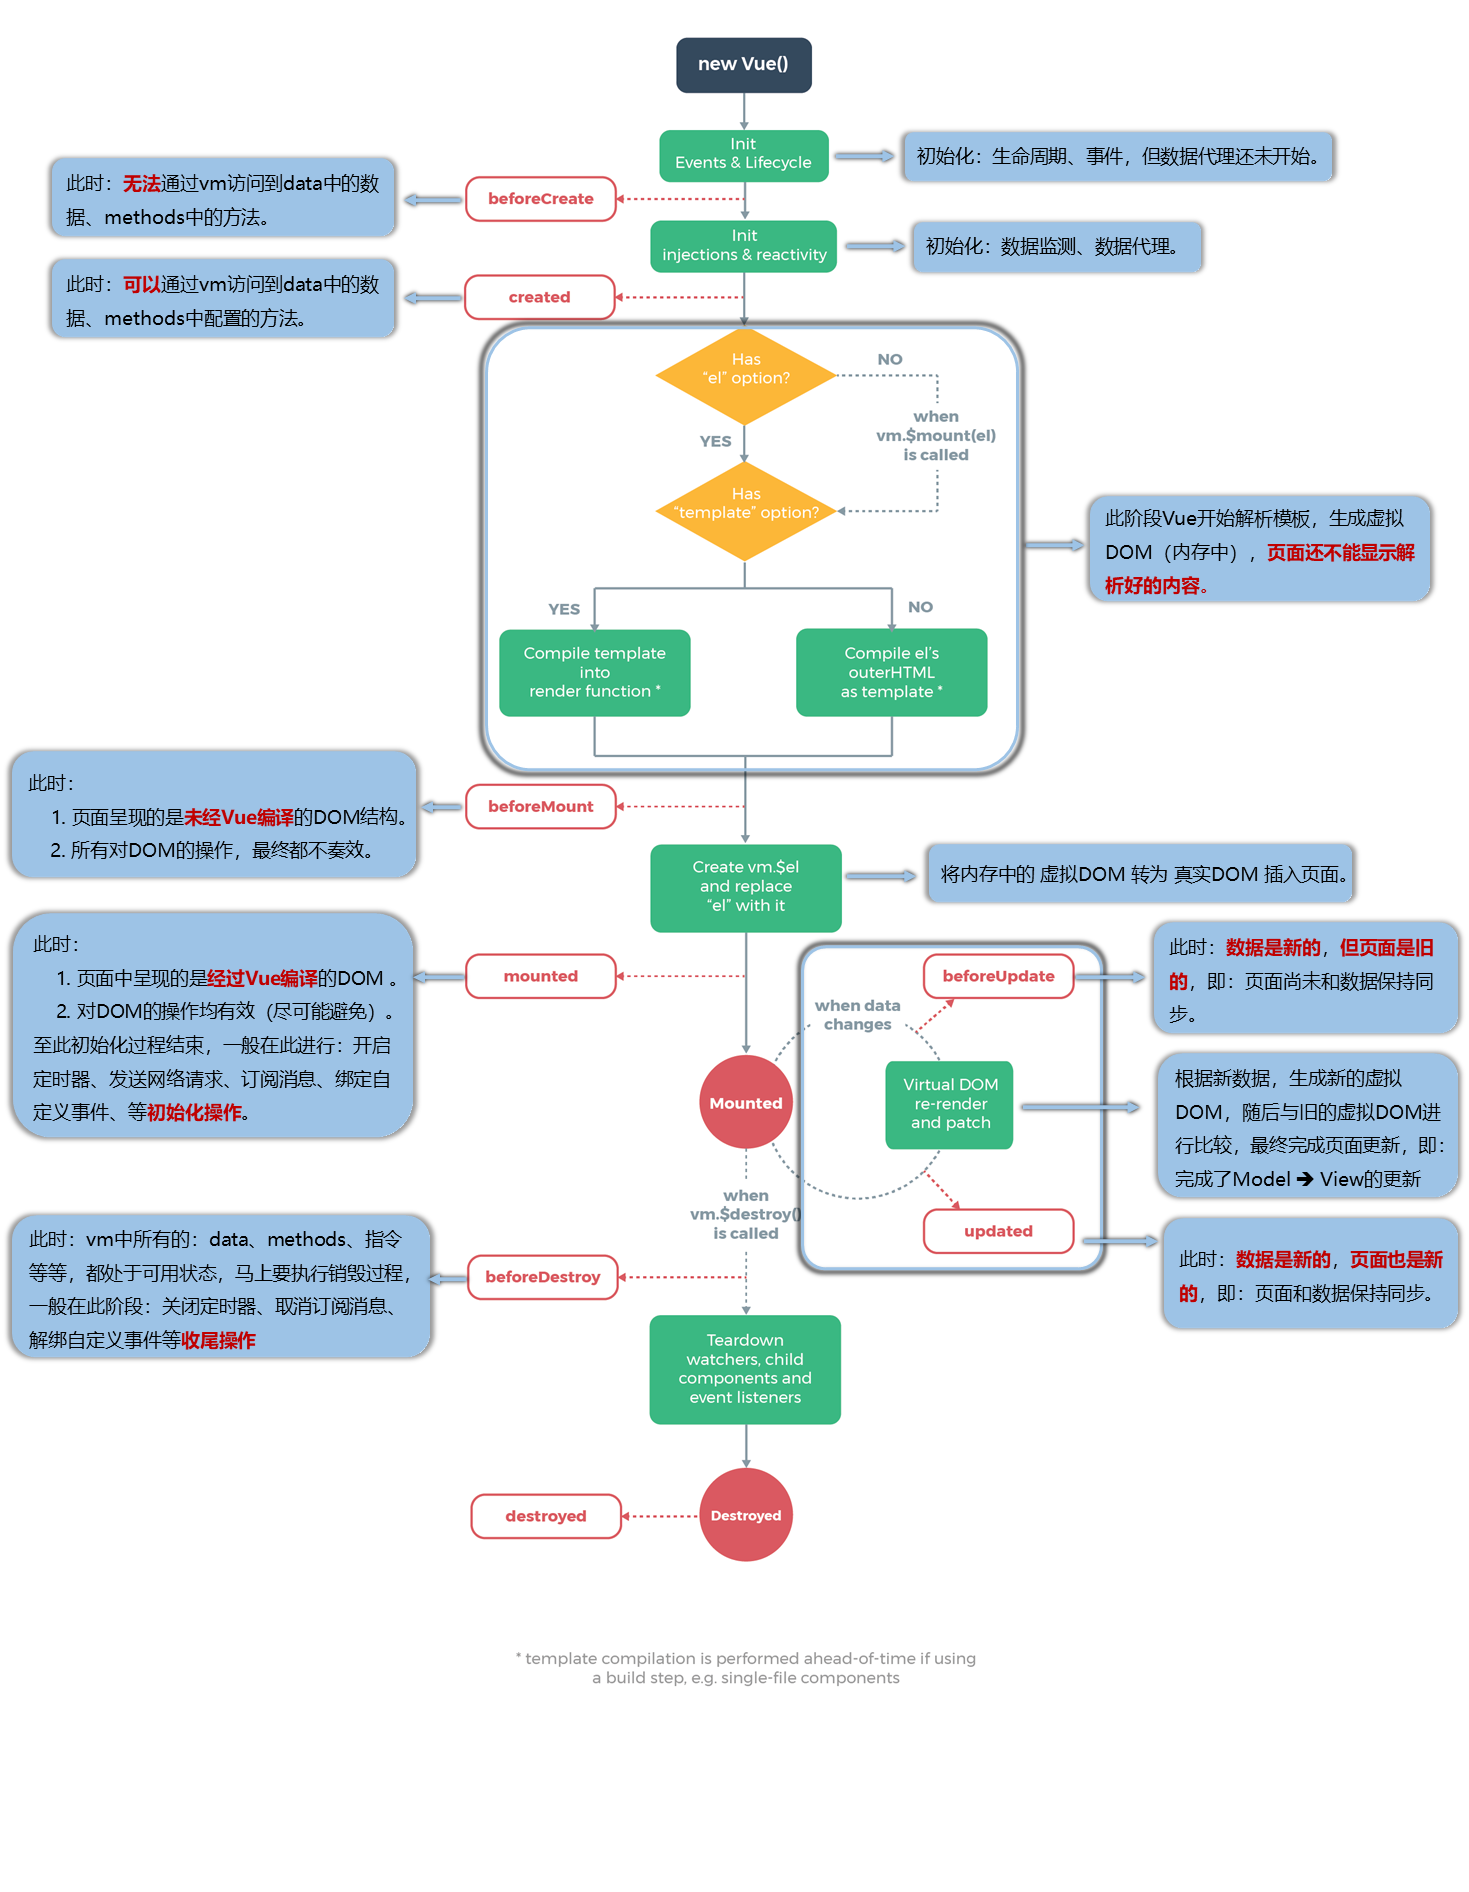
总结生命周期
beforeCreate(创建前) :数据监测(getter和setter)和初始化事件还未开始,此时 data 的响应式追踪、event/watcher 都还没有被设置,也就是说不能访问到data、computed、watch、methods上的方法和数据。created(创建后) :实例创建完成,实例上配置的 options 包括 data、computed、watch、methods 等都配置完成,但是此时渲染得节点还未挂载到 DOM,所以不能访问到 $el属性。beforeMount(挂载前) :在挂载开始之前被调用,相关的render函数首次被调用。此阶段Vue开始解析模板,生成虚拟DOM存在内存中,还没有把虚拟DOM转换成真实DOM,插入页面中。所以网页不能显示解析好的内容。mounted(挂载后) :在el被新创建的 vm.$el(就是真实DOM的拷贝)替换,并挂载到实例上去之后调用(将内存中的虚拟DOM转为真实DOM,真实DOM插入页面)。此时页面中呈现的是经过Vue编译的DOM,这时在这个钩子函数中对DOM的操作可以有效,但要尽量避免。一般在这个阶段进行:开启定时器,发送网络请求,订阅消息,绑定自定义事件等等beforeUpdate(更新前) :响应式数据更新时调用,此时虽然响应式数据更新了,但是对应的真实 DOM 还没有被渲染(数据是新的,但页面是旧的,页面和数据没保持同步)。updated(更新后) :在由于数据更改导致的虚拟DOM重新渲染和打补丁之后调用。此时 DOM 已经根据响应式数据的变化更新了。调用时,组件 DOM已经更新,所以可以执行依赖于DOM的操作。然而在大多数情况下,应该避免在此期间更改状态,因为这可能会导致更新无限循环。该钩子在服务器端渲染期间不被调用。beforeDestroy(销毁前) :实例销毁之前调用。这一步,实例仍然完全可用,this 仍能获取到实例。在这个阶段一般进行关闭定时器,取消订阅消息,解绑自定义事件。destroyed(销毁后) :实例销毁后调用,调用后,Vue 实例指示的所有东西都会解绑定,所有的事件监听器会被移除,所有的子实例也会被销毁。该钩子在服务端渲染期间不被调用。
常用的生命周期钩子
关于销毁Vue 实例
销毁后借助Vue开发者工具看不到任何信息
销毁后自定义事件会失效,但原生DOM事件依然有效
一般不会在beforeDestroy操作数据,因为即便操作数据,也不会再触发更新流程了
1 2 3 4 5 6 7 8 9 10 11 12 13 14 15 16 17 18 19 20 21 22 23 24 25 26 27 28 29 30 31 32 33 34 <div id ="root" > <h2 :style ="{opacity}" > 欢迎学习Vue</h2 > <button @click ="opacity = 1" > 透明度设置为1</button > <button @click ="stop" > 点我停止变换</button > </div > <script type ="text/javascript" > Vue .config .productionTip = false new Vue ({ el : '#root' , data : { opacity : 1 }, methods : { stop ( this .$destroy() } }, mounted ( console .log ('mounted' , this ) this .timer = setInterval (() => { console .log ('setInterval' ) this .opacity -= 0.01 if (this .opacity <= 0 ) this .opacity = 1 }, 16 ) }, beforeDestroy ( clearInterval (this .timer ) console .log ('vm即将驾鹤西游了' ) }, }) </script >
组件
模块与组件、模块化与组件化
模块
理解:向外提供特定功能的 js 程序,一般就是一个 js 文件
为什么:js 文件很多很复杂
作用:复用、简化 js 的编写,提高 js 运行效率
组件
定义:用来实现局部功能的代码和资源的集合 (html/css/js/image…)
为什么:一个界面的功能很复杂
作用:复用编码,简化项目编码,提高运行效率
模块化
非单文件组件
非单文件组件 :一个文件中包含有 n 个组件单文件组件 :一个文件中只包含有 1 个组件
基本使用
Vue中使用组件的三大步骤:
定义组件(创建组件)
注册组件
使用组件(写组件标签)
定义组件
使用**Vue.extend(options)**创建,其中options和new Vue(options)时传入的那个options几乎一样,但也有点区别;
区别如下:
el 不要写,为什么? ——— 最终所有的组件都要经过一个vm的管理,由vm中的el决定服务哪个容器。data 必须写成函数,为什么? ———— 避免组件被复用时,数据存在引用关系。
讲解一下面试小问题:data必须写成函数:
这是js底层设计的原因:举个例子
对象形式
1
2
3
4
5
6
7
8
9
10
11
let data = { a : 99 , b : 100 } let x = data;let y = data;x.a = 66 ; console .loh (x); console .log (y);
函数形式
1
2
3
4
5
6
7
8
9
10
function data ( return { a : 99 , b : 100 } } let x = data ();let y = data ();console .log (x === y);
备注:使用template可以配置组件结构。
创建一个组件案例:Vue.extend() 创建
1
2
3
4
5
6
7
8
9
10
11
12
13
14
15
16
17
18
19
20
21
22
23
24
25
26
27
28
29
30
31
32
33
34
35
36
37
38
39
40
41
42
43
44
45
46
47
48
49
50
51
52
53
54
55
56
<script type="text/javascript"> Vue.config.productionTip = false //第一步:创建school组件 const school = Vue.extend({ template:` <div class="demo"> <h2>学校名称:{{schoolName}}</h2> <h2>学校地址:{{address}}</h2> <button @click="showName">点我提示学校名</button> </div> `, // el:'#root', //组件定义时,一定不要写el配置项,因为最终所有的组件都要被一个vm管理,由vm决定服务于哪个容器。 data(){ return { schoolName:'尚硅谷', address:'北京昌平' } }, methods: { showName(){ alert(this.schoolName) } }, }) //第一步:创建student组件 const student = Vue.extend({ template:` <div> <h2>学生姓名:{{studentName}}</h2> <h2>学生年龄:{{age}}</h2> </div> `, data(){ return { studentName:'张三', age:18 } } }) //第一步:创建hello组件 const hello = Vue.extend({ template:` <div> <h2>你好啊!{{name}}</h2> </div> `, data(){ return { name:'Tom' } } }) </script>
注册组件
局部注册:靠new Vue的时候传入components选项
全局注册:靠Vue.component(‘组件名’,组件)
局部注册(只有注册了那个组件的才能使用)
1
2
3
4
5
6
7
8
9
10
11
12
13
14
15
16
17
18
<script> //创建vm new Vue({ el: '#root', data: { msg:'你好啊!' }, //第二步:注册组件(局部注册) components: { //左边才是组件名 school: school, student: student // ES6简写形式 // school, // student } }) </script>
全局注册(所有的都可以使用)
1
2
3
4
<script> //第二步:全局注册组件 Vue.component('hello', hello) </script>
使用组件
1
2
3
4
5
6
7
8
9
10
11
12
<!-- 准备好一个容器--> <div id="root"> <hello></hello> <hr> <h1>{{msg}}</h1> <hr> <!-- 第三步:编写组件标签 --> <school></school> <hr> <!-- 第三步:编写组件标签 --> <student></student> </div>
组件注意事项
关于组件名:
一个单词组成:
第一种写法(首字母小写):school
第二种写法**(首字母大写)**:School(推荐)
多个单词组成:
第一种写法**(kebab-case命名)**:my-school
第二种写法**(CamelCase命名)**:MySchool (需要Vue脚手架支持)(推荐)
备注:
(1).组件名尽可能回避HTML中已有的元素名称,例如:h2、H2都不行。
(2).可以使用name配置项指定组件在开发者工具中呈现的名字。
关于组件标签:
第一种写法:<school></school>
第二种写法:<school/>
备注:不用使用脚手架时,
一个简写方式:
const school = Vue.extend(options) 可简写为:const school = options
1 2 3 4 5 6 7 8 9 10 11 12 13 14 15 16 17 18 19 20 21 22 23 24 25 26 27 28 29 30 31 32 33 34 35 <div id ="root" > <h2 > {{msg}}</h2 > <school > </school > </div > <script type ="text/javascript" > Vue .config .productionTip = false const school = Vue .extend ({ name : 'atguigu' , template : ` <div> <h3>学校名称:{{name}}</h3> <h3>学校地址:{{address}}</h3> </div> ` , data ( return { name : 'dselegent' , address : '长沙' } } }) new Vue ({ el : '#root' , data : { msg : '欢迎学习Vue!' }, components : { school } }) </script >
组件的嵌套
1 2 3 4 5 6 7 8 9 10 11 12 13 14 15 16 17 18 19 20 21 22 23 24 25 26 27 28 29 30 31 32 33 34 35 36 37 38 39 40 41 42 43 44 45 46 47 48 49 50 51 52 53 54 55 56 57 <div id ="root" > </div > <script type ="text/javascript" > Vue.config.productionTip = false //定义student组件 const student = Vue.extend({ name: 'student', template: ` <div > <h4 > 学生姓名: {{name }} </h4 > <h4 > 学生年龄: {{age }} </h4 > </div > `, data() {return {name: '尚硅谷',age: 18}} }) //定义school组件 const school = Vue.extend({ name: 'school', template: ` <div > <h3 > 学校名称: {{name }} </h3 > <h3 > 学校地址: {{address }} </h3 > <student > </student > </div > `, data() {return {name: '尚硅谷',address: '北京'}}, //注册组件(局部) components: { student } }) //定义hello组件 const hello = Vue.extend({ template: `<h3 > {{msg }} </h3 > `, data() {return {msg: '欢迎来到尚硅谷学习!'}} }) //定义app组件 const app = Vue.extend({ template: ` <div > <hello > </hello > <school > </school > </div > `, components: { school, hello } }) //创建vm new Vue({ el: '#root', template: '<app > </app > ', //注册组件(局部) components: { app } }) </script >
VueComponent
school组件本质是一个名为VueComponent的构造函数,且不是程序员定义的,是Vue.extend生成的。
我们只需要写<school/>或<school></school>,Vue解析时会帮我们创建school组件的实例对象 ,即Vue帮我们执行的:new VueComponent(options)。
特别注意:每次调用Vue.extend,返回的都是一个全新的VueComponent,即不同组件是不同的对象
关于this指向:
组件配置中:data函数、methods中的函数、watch中的函数、computed中的函数 它们的this均是VueComponent实例对象。
new Vue(options)配置中:data函数、methods中的函数、watch中的函数、computed中的函数 它们的this均是Vue实例对象。
VueComponent的实例对象,以后简称vc(也可称之为:组件实例对象)。Vue的实例对象,以后简称vm。
1 2 3 4 5 6 7 8 9 10 11 12 13 14 15 16 17 18 19 20 21 22 23 24 25 26 27 28 29 30 31 32 33 34 35 36 37 38 39 40 41 42 43 44 45 46 47 <div id ="root" > <school > </school > <hello > </hello > </div > <script type ="text/javascript" > Vue .config .productionTip = false const school = Vue .extend ({ name : 'school' , template : ` <div> <h2>学校名称:{{name}}</h2> <h2>学校地址:{{address}}</h2> <button @click="showName">点我提示学校名</button> </div> ` , data (return {name : '尚硅谷' ,address : '北京' }}, methods : {showName (console .log ('showName' , this )}}, }) const test = Vue .extend ({ template : `<span>atguigu</span>` }) const hello = Vue .extend ({ template : ` <div> <h2>{{msg}}</h2> <test></test> </div> ` , data (return {msg : '你好啊!' }}, components : { test } }) const vm = new Vue ({ el : '#root' , components : { school, hello } }) </script >
Vue 在哪管理 VueComponent
一个重要的内置关系
一个重要的内置关系:VueComponent.prototype.proto === Vue.prototype
为什么要有这个关系:让组件实例对象(vc)可以访问到 Vue原型上的属性、方法。
例:main.js中Vue.prototype.Axios = Axios;
组件xxx.vue中this.Axios({});
单文件组件
单文件组件就是将一个组件的代码写在 .vue 这种格式的文件中,webpack 会将 .vue 文件解析成 html,css,js这些形式。
来做个单文件组件的案例:
School.vue
1
2
3
4
5
6
7
8
9
10
11
12
13
14
15
16
17
18
19
20
21
22
23
24
25
26
27
28
29
30
31
32
33
34
35
36
37
38
39
40
41
42
43
44
45
46
<template> <div class="demo"> <h2>学校名称:{{name}}</h2> <h2>学校地址:{{address}}</h2> <button @click="showName">点我提示学校名</button> </div> </template> <script> export default { name:'School', data(){ return { name:'尚硅谷', address:'北京昌平' } }, methods: { showName(){ alert(this.name) } }, } //上面是下面的精简版 const school = Vue.extend({ name:'School', data(){ return { name:'尚硅谷', address:'北京昌平' } }, methods: { showName(){ alert(this.name) } }, }) export default school; </script> <style> .demo{ background-color: orange; } </style>
Student.vue
1
2
3
4
5
6
7
8
9
10
11
12
13
14
15
16
17
18
<template> <div> <h2>学生姓名:{{name}}</h2> <h2>学生年龄:{{age}}</h2> </div> </template> <script> export default { name:'Student', data(){ return { name:'张三', age:18 } } } </script>
App.vue
用来汇总所有的组件(大总管)
1
2
3
4
5
6
7
8
9
10
11
12
13
14
15
16
17
18
19
20
<template> <div> <School></School> <Student></Student> </div> </template> <script> //引入组件 import School from './School.vue' import Student from './Student.vue' export default { name:'App', components:{ School, Student } } </script>
main.js
在这个文件里面创建 vue 实例
1
2
3
4
5
6
7
import App from './App.vue' new Vue ({ el :'#root' , template :`<App></App>` , components :{App }, })
index.html
在这写 vue 要绑定的容器
1
2
3
4
5
6
7
8
9
10
11
12
13
<!DOCTYPE html > <html > <head > <meta charset ="UTF-8" /> <title > 练习一下单文件组件的语法</title > </head > <body > <div id ="root" > </div > <script type ="text/javascript" src ="../js/vue.js" > </script > <script type ="text/javascript" src ="./main.js" > </script > </body > </html >
内置指令 自定义指令 CLI 初始化脚手架 Vue零碎的一些知识